


According to the experts, children learn faster through fun-based
activities. Hence, what better way than serving them with intellectual
menu through interesting general knowledge quizzes. The kids will
definitely give a listening ear, and will also learn more. Weekends are
quite good for these interesting quizzes. We bring to you ten easy and
fun general knowledge questions and answers.
Popular Posts
-
 1. Have a fast internet connection. When it comes to booking a Tatkal ticket, Internet connectivity and speed is one factor that we t...
 -
1. Download your Facebook data With so much of our lives plastered over Facebook, many of us feel forever locked in for fear of losing...
-
Many of us don’t like to say no to a coworker or a boss—for instance, when the boss asks for a tighter deadline, or a team member needs a ...
-
1. To audit the commands we’d run in past, we use history command. Here is a sample output of history command. # history history comm...
-
Oiling: Oil your hair with warm coconut oil, castor oil or olive oil. If you have dandruff add 8-10 drops of lemon in your oil and...
-
Let us proceed into Moto G tips and tricks: 1. Secure your smartphone Anti-Theft made easy by your stock android feature: What if y...
-
1. VLC Inception Trick Wondering what’s inception here? Well, VLC Media Player can take screenshot of your current screen and keep on t...
-
In these key combinations, hold down the Windows key (normally located between Alt and Ctrl) and another key, as described on this list...
-
1. Changing your Friend’s profile picture You can change the way your Friend’s profile picture looks like, but that doesn’t mean that th...
-
 This tip will work with most of the modern laptops and smartphones. Let’s get started. 1. How to break in new laptop & sm...
Monday, 20 April 2020

Sunday, 19 April 2020
GK questions 01
According to the experts, children learn faster through fun-based activities. Hence, what better way than serving them with intellectual menu through interesting general knowledge quizzes. The kids will definitely give a listening ear, and will also learn more. Weekends are quite good for these interesting quizzes. We bring to you ten easy and fun general knowledge questions and answers.
Sunday, 15 May 2016
IRCTC Tatkal Ticket Booking Tips
1. Have a fast internet connection.
 When it comes to booking a Tatkal ticket, Internet connectivity and
speed is one factor that we tend to ignore. Faster internet can
magically convert your “maybe waitlisted” ticket into a confirmed
ticket! With a high speed broad band, a 3G or 4G mobile connection, you
can book and complete the payment faster.
When it comes to booking a Tatkal ticket, Internet connectivity and
speed is one factor that we tend to ignore. Faster internet can
magically convert your “maybe waitlisted” ticket into a confirmed
ticket! With a high speed broad band, a 3G or 4G mobile connection, you
can book and complete the payment faster.
2. Book from a personal network.


 An extremely unassuming trick is to use Chrome or Mozilla as your
browser as these are faster among the rest. Don’t risk your confirmed
tickets to the mercy of something like Internet Explorer or Opera.
An extremely unassuming trick is to use Chrome or Mozilla as your
browser as these are faster among the rest. Don’t risk your confirmed
tickets to the mercy of something like Internet Explorer or Opera.
5. Disable Images.
 Images also take up a lot of bandwidth and slow down the loading process
of the IRCTC website. All browsers allow users to disable images and
the option is available through browser settings.
Images also take up a lot of bandwidth and slow down the loading process
of the IRCTC website. All browsers allow users to disable images and
the option is available through browser settings.
6. Use the IRCTC Master List.

Go to the profile tab on IRCTC and add all passenger details to the master list. You may also add their respective ID card details.
7. Decode the CAPTCHA quickly.
 Enter the captcha as quickly as possible and move on to the payment
page. If the captcha is not clear enough, “Refresh Captcha” to get a new
one instead of guessing it.
Enter the captcha as quickly as possible and move on to the payment
page. If the captcha is not clear enough, “Refresh Captcha” to get a new
one instead of guessing it.
Size Problem: Size of Captcha image during Tatkal hour is very small so increase the size of image so that you can read captcha easily. You can do that by zooming your browser (I have zoom out around 200%)


Internet Banking always has an edge over Credit, Debit or other Cash
Cards because you can bypass entering the never ending card numbers and
other details. SBI, HDFC and Union Bank provide Internet banking payment
gateways without OTP verification and save time. ICICI bank’s payment
gateway is usually a slower option.
ADDITIONAL TIP: You can get an OTP issued from the bank shortly before the tatkal timings and keep it unused and safe. This OTP can be directly entered when you’re actually processing the payment during the tatkal timings.

2. Book from a personal network.

Preferably book your tickets on your home network instead of trying to
book at your work place, college or from any other shared public network
because many people will be trying to book their tickets and all of
them have the same parent IP address. IRCTC allows only 2 tickets to be
booked from a single IP address. Apart from the first lucky 2, everyone
else is destined to be disappointed
3. Come early on IRCTC site.

Make sure your computer time is in sync with IRCTC. Search for any train on Indianrail.gov.in
and see the time at the bottom and compare against your system time.
Log into your IRCTC account by around 09:55 am. Keep your session alive
by periodically hitting on My Profile > Master List till 9:58. Then
proceed to “Plan My Travel” Page. Fill in the journey details, choose
quota as Tatkal. And the moment the IRCTC clock ticks 10:00, click
submit. “The early bird catches the worm!”
4. Use a fast internet browser.

5. Disable Images.

6. Use the IRCTC Master List.

Go to the profile tab on IRCTC and add all passenger details to the master list. You may also add their respective ID card details.
7. Decode the CAPTCHA quickly.

Size Problem: Size of Captcha image during Tatkal hour is very small so increase the size of image so that you can read captcha easily. You can do that by zooming your browser (I have zoom out around 200%)

8. Choose a faster payment gateway.

ADDITIONAL TIP: You can get an OTP issued from the bank shortly before the tatkal timings and keep it unused and safe. This OTP can be directly entered when you’re actually processing the payment during the tatkal timings.
Sunday, 1 May 2016
Tips For maintain & increase lifespan of laptop battery
This tip will work with most of the modern laptops and smartphones. Let’s get started.

1. How to break in new laptop & smartphone battery
Let’s say you just purchased a new battery for your laptop or smartphone. In our understanding, most people will just use their laptops and smartphones right away after installing, but this is not a good way to use your new battery. Most batteries need break-in period just like speakers. Without any break-in, the battery reading or battery life will not be accurate. Breaking in batteries will help the batteries perform the optimal performance. Let’s learn how to do it.1. Install your new battery to your device, and charge it for overnight with your device turned off. Do not use your device (laptop or smartphone) right away.
2. After the battery fully charged, unplug the power adapter, and start to use your device to discharge the battery. Use it until your device shuts down or until it says low battery.
3. Repeat this 3 – 5 times.
2. How to maintain & increase lifespan of laptop battery (Only for laptops)
We are now going to learn how to maintain your laptop battery properly to maximize the lifespan. Here are some tips.1. Do full charging & discharging once a month.
2. When your laptop is fully charged, unplug the power adapter and use with battery power.
3. If you are using your laptop at home, remove the battery, and use with power adapter.
4. If you are not using your laptop for a long time, remove the battery and store it separately.
Sunday, 20 March 2016
Natural skin and hair care tips for Holi

Oiling: Oil your hair with warm coconut oil, castor oil or olive oil. If you have dandruff add 8-10 drops of lemon in your oil and liberally apply the mixture in your hair. Apply oil all over your body, including hands, feet, and elbows. Do the oiling part at least 20-25 minutes before you start.
Moisturise: Use a generous amount of moisturizer with sunscreen all over your body, especially behind your ears and ear lobes as these are areas one tends to neglect. Make sure that the moisturizer has an SPF as you do not want to catch a tan from the sun!
Clothing: Wear dark colour-full sleeves cotton clothes. Synthetics would be sticky and denims would be heavy once you have a bucket full of water splashed on you.
Ensure that the clothes
you choose to wear should cover maximum parts of your body. The best choices would be high-necks or full-sleeves. The rule; the more you cover your body, the higher are the chances of saving your skin from colour harm.
Nail paints: Protect your nails by applying nail polish as this will give you a protective coat.
Water: Drink loads of water before you start playing Holi. This will keep your skin hydrated. Also keep sipping water carefully while playing Holi.
Lips and Eyes: Don't wear lenses. In fact completely avoid wearing lenses or glasses. But if you cannot do without glasses, just be careful while applying colour. Mostly people are interested in applying surprise colours on your face and the edges of your specs might hurt your face. For lips, apply a lip balm generously.
Don't get waxing, threading, facials or skin treatment done at least 3-4 days before Holi.
Soothing: Use an aloe vera gel, cucumber juice or at least a rose water bottle handy with you, just in case get some irritation from a colour, these would act as soothing agents.
If you have acne avoid scrubbing your face past Holi. Use a paste of raw milk and besan and gently work on your face to remove the colours.
Use glycerin or aloe vera based soaps. Some people use detergent soaps on their body to remove colour. AVOID such desperate attempts. Apply a body lotion on your body generously after taking bath.
Wednesday, 16 March 2016
Best Facebook tips and tricks
1. Download your Facebook data
With so much of our lives plastered over Facebook, many of us feel forever locked in for fear of losing that content. It doesn't have to be this way. Facebook can email you a Zip file containing any posts, photos and videos you've shared, messages and chat conversations, information from the About section of your profile, and more. Just click the downward triangle at the top right of the page and choose Settings. On the General tab hit the link 'Download a copy of your Facebook data'. Finally, on the next page click 'Start My Archive'.2. Keep your parents off Facebook: Make your photo albums available offline
My mum keeps threatening to join Facebook. She's
interested only in looking at my photo albums. Rather than giving her
access to everything and staying on my best behaviour forever more, I
can simply send her a link to view the photo album offline. To do this
just open an album and click the settings icon. Choose Get link. You can
either copy and paste the photo album link or click 'Send in message',
but note that the latter uses Facebook's messaging system, so it won't
work for your not-on-Facebook mum. So copy the link, open an email
client, paste in the link, address the email to your mum, hit Send and
voila.
3. Display a nickname or maiden name
Remember when people used to change their names on
Facebook every other week, perhaps adding in a nickname or a maiden
name? Well, Facebook had the last laugh when it limited the number of
times you could change your profile name. As if the wind had changed,
all of a sudden you were stuck with that name for all eternity. For
example, I know a bloke called Neil who is now called Philip for
Facebook purposes (I don't pretend to understand why).
If you must play around with nicknames, maiden names or
whatever, there is a better way to do it. Click the downward triangle at
the top of the screen and choose Settings, then on the General tab
click Edit next to Name. Enter an alternate name and tick the box to
include it on your Timeline, then click Save changes. Don't try to add
anything that is either offensive, promotes your business or
impersonates someone else, however - Facebook will block your attempts.

4. Block app requests and notifications
Did you just get yet another request to play Candy Crush Saga? Or are your friends pestering you to log into Meow Chat? Are you still just as disinterested as ever? The good news is that it's incredibly easy to block Candy Crush Saga, Meow Chat and any other apps that irritate you. Just click that downward triangle icon, choose Settings, Blocking, then scroll to the bottom of the page and enter the names of any apps you don't want to hear from.
5. Limit who can see a post
Sometimes you don't want a specific friend to see a
particular item that you're sharing. Perhaps you don't want your mum to
see a photo of you holding a cigarette, or your boss to see a post in
which you're telling the world you're pulling a sicky. Write up your
status or add an image as you normally would, but before you hit post
click the Friends drop-down before it. Choose More options. From here
you can choose to share it with either a particular friends list, or you
can click Custom to specify exactly who can and who can't see the
update.

6. Keep your Facebook profile private
Facebook these days does a pretty good job of securing
your privacy by default, but you may have accidentally altered a setting
and are now giving away far more information than you'd like - and
potentially to complete strangers. Head to Settings, Privacy and check
all the options listed. From here you can define who can see your posts,
items you've shared or those you're tagged in, as well as who can
request you as a friend. There are other options, too. Check them out.

Sunday, 10 January 2016
Trick To Hide Text In Notepad
Steps to hide text in a Notepad
1. Open your command prompt Start–>Run and Type cmd
2. Type cd.. to move to C:\> drive or Type cd desktop to move to your desktop.
3. Type the below code in your command prompt
notepad filename.txt:hidden
4. Write some data and save(Ctrl+S) the file.
5. Browse to the file location and Open filename.txt you cannot see any data in the file.
6. To retrieve the hidden data open command prompt and type the same command.
notepad filename.txt:hidden
Hide Drives for security & Privacy
Hide Drives for security & Privacy :-
This is a great trick you can play on your friends. To disable the display of local or networked drives when you click My Computer.
1.Go to start->run.Type regedit.Now go to:
HKEY_CURRENT_USER\Software\Microsoft\Windows\CurrentVersion\Policies\Explorer
Now in the right pane
create a new DWORD item and name it NoDrives (it is case sensitive).
Now modify it's value and set it to 3FFFFFF (Hexadecimal) .
Now restart your computer.
So, now when you click on My Computer, no drives will be shown(all gone...).
To enable display of drives in My Computer, simply delete this DWORD item that you created.Again restart your computer.You can now see all the drives again.
Sunday, 18 October 2015
8 Simple Tips for Improving Your Web Design
Want to ensure that visitors will exit your website almost immediately after landing there? Be sure to make it difficult for them to find what it is they are looking for. Want to get people to stay on your website longer and click on or buy stuff? Follow these 13 Web design tips.
1. Have a polished, professional logo--and link it to your home page.
"Your logo is an important part of your brand, so make sure it's
located prominently on your site," says Tiffany Monhollon, senior
content marketing manager at online marketer ReachLocal.
"Use a high-resolution image and feature it in the upper left corner of
each of your pages," she advises. "Also, it's a good rule of thumb to
link your logo back to your home page so that visitors can easily
navigate to it."
2.Use intuitive navigation. "Primary navigation
options are typically deployed in a horizontal [menu] bar along the top
of the site," says Brian Gatti, a partner with Inspire Business Concepts,
a digital marketing company. Provide "secondary navigation options
underneath the primary navigation bar, or in the [left-hand] margin of
the site, known as the sidebar."
Why is intuitive navigation so important? "Confusing navigation layouts
will result in people quitting a page rather than trying to figure it
out," Gatti says. So instead of putting links to less important
pages--that detract from your call to action or primary information--at
the top of your home or landing pages, put "less important links or
pieces of information at the bottom of a page in the footer."
3. Get rid of clutter. "It's very easy these days to
be visually overloaded with images, to the point where our brains stop
processing information when confronted with too many options," explains
Paolo Vidali, senior digital marketing strategist, DragonSearch, a digital marketing agency.
To
keep visitors on your site, "make sure pages do not have competing
calls to action or visual clutter [e.g., lots of graphics, photographs
or animated gifs] that would draw the visitor's eyes away from the most
important part of the page." To further keep clutter down on landing
pages, "consider limiting the links and options in the header and footer
to narrow the focus even further," he says.
Another tip to streamlining pages: "Keep paragraphs short," says Ian Lurie, CEO of internet marketing company Portent, Inc. "On most Web sites, a single paragraph should be no more than five to six lines."
4. Give visitors breathing room. "Create enough
space between your paragraphs and images so the viewer has space to
breathe and is more able to absorb all of the features your site and
business have to offer," says Hannah Spencer, graphic designer, Coalition Technologies, a Web design and online marketing agency.
"Controlling
white space through layout will keep users focused on the content and
control user flow," adds Paul Novoa, founder and CEO at Novoa Media.
"With a lot of visual competition taking place on the Web and on
mobile, less is more. Controlling white space will improve user
experience, increasing returns from the website."
5. Use color strategically. Using "a mostly neutral
color palette can help your site project an elegant, clean and modern
appearance," says Mark Hoben, the head of Web design at Egencia,
the business travel division of the Expedia group, who is also a
believer in using color wisely. "Employing small dashes of color--for
headlines or key graphics--helps guide visitors to your most important
content," he explains.
6. Choose fonts that are easy to read across devices and browsers.
When choosing fonts, keep in mind that people will be looking at your
website not just on a laptop but on mobile devices. "Some large-scaled
fonts may read well on [a computer monitor], but not scale or render
well on mobile, losing the desired look and feel," explains Novoa. So he
advises using a universal font.
"Pick a typeface that can be easily read and size it no less than 11pt," says Ethan Giffin, CEO, Groove Commerce. "If you're using Web fonts, try to use no more than two font families in order to ensure fast load times," he says.Popular On CIO.com
"If you're using a fixed-width design, use a font size that
allows a maximum of 15 to 20 words per line," adds Lurie. "If you're
using a fluid design, use a font size that allows 15 to 20 words per
line at 900 to 1000 pixels wide."
7. Design every page as a landing page. "Most websites
have a design that assumes a user enters through the home page and
navigates into the site," says Michael Freeman, senior manager, Search
& Analytics, ShoreTel, Inc.,
which provides hosted VoIP, cloud PBX service and business phone
systems. "The reality, though, is that the majority of visits for most
sites begin on a page that is not the home page," he says. Therefore,
you need to design the site in such a way that whatever page a visitor
lands on, key information is there.
8. Test your design. "Whether you are trying different
placements for a call to action or even testing different shades of a
color, website optimization can make a big impact to your bottom line,"
states Lindsey Marshall, production director, Red Clay Interactive,
an Atlanta-based interactive marketing agency. "A user experience
manager at Bing once remarked that Microsoft generated an additional $80
million in annual revenue just by testing and implementing a specific
shade of blue!"
Wednesday, 2 September 2015
Windows Tips and Tricks
1. Select and Focus Taskbar Applications
To select and focus applications in the taskbar, hold down the Windows key, press T, and use the arrow keys or type
T repeatedly. This lets you scroll through the pinned applications without ever touching your mouse.

2. Copy, Paste or Undo a File Move
Most people know that the key commands Ctrl+C, Ctrl+V and Ctrl+Z are handy for copying, pasting and deleting text,
but did you know that you can use these commands for files as well?

3. Tile Windows
With Windows 7 came Aero Snap, or the ability to maximize a window by dragging it to the side of the screen. But
what if you want to easily tile your windows?

4. Open an Application
To start an application that is pinned to the taskbar, hold the Windows key and press the number that corresponds
with its location (Win+number from one to nine).

To select and focus applications in the taskbar, hold down the Windows key, press T, and use the arrow keys or type
T repeatedly. This lets you scroll through the pinned applications without ever touching your mouse.

2. Copy, Paste or Undo a File Move
Most people know that the key commands Ctrl+C, Ctrl+V and Ctrl+Z are handy for copying, pasting and deleting text,
but did you know that you can use these commands for files as well?

3. Tile Windows
With Windows 7 came Aero Snap, or the ability to maximize a window by dragging it to the side of the screen. But
what if you want to easily tile your windows?

4. Open an Application
To start an application that is pinned to the taskbar, hold the Windows key and press the number that corresponds
with its location (Win+number from one to nine).

Sunday, 30 August 2015
5 Command Line Tips and Tricks in Linux
1. To audit the commands we’d run in past, we use history command. Here is a sample output of history command.

Obvious from output, the history command do not output the time stamp
with the log of last executed commands. Any solution for this? Yeah!
Run the below command.

2. The next gem in the list is – how to check disk write speed? Well one liner dd command script serves the purpose.

Explanation of commands and switches.

Explanation of commands and switches.

5. The next and last but not the least, this one
line script is for those, who are newbies. If you are an experienced
user you probably don’t need it, unless you want some fun out of it.
Well newbies are Linux-command-line phobic and the below one liner will
generate random man pages. The benefit is as a newbie you always get
something to learn and never get bored.

Explanation of commands and switches.
# history
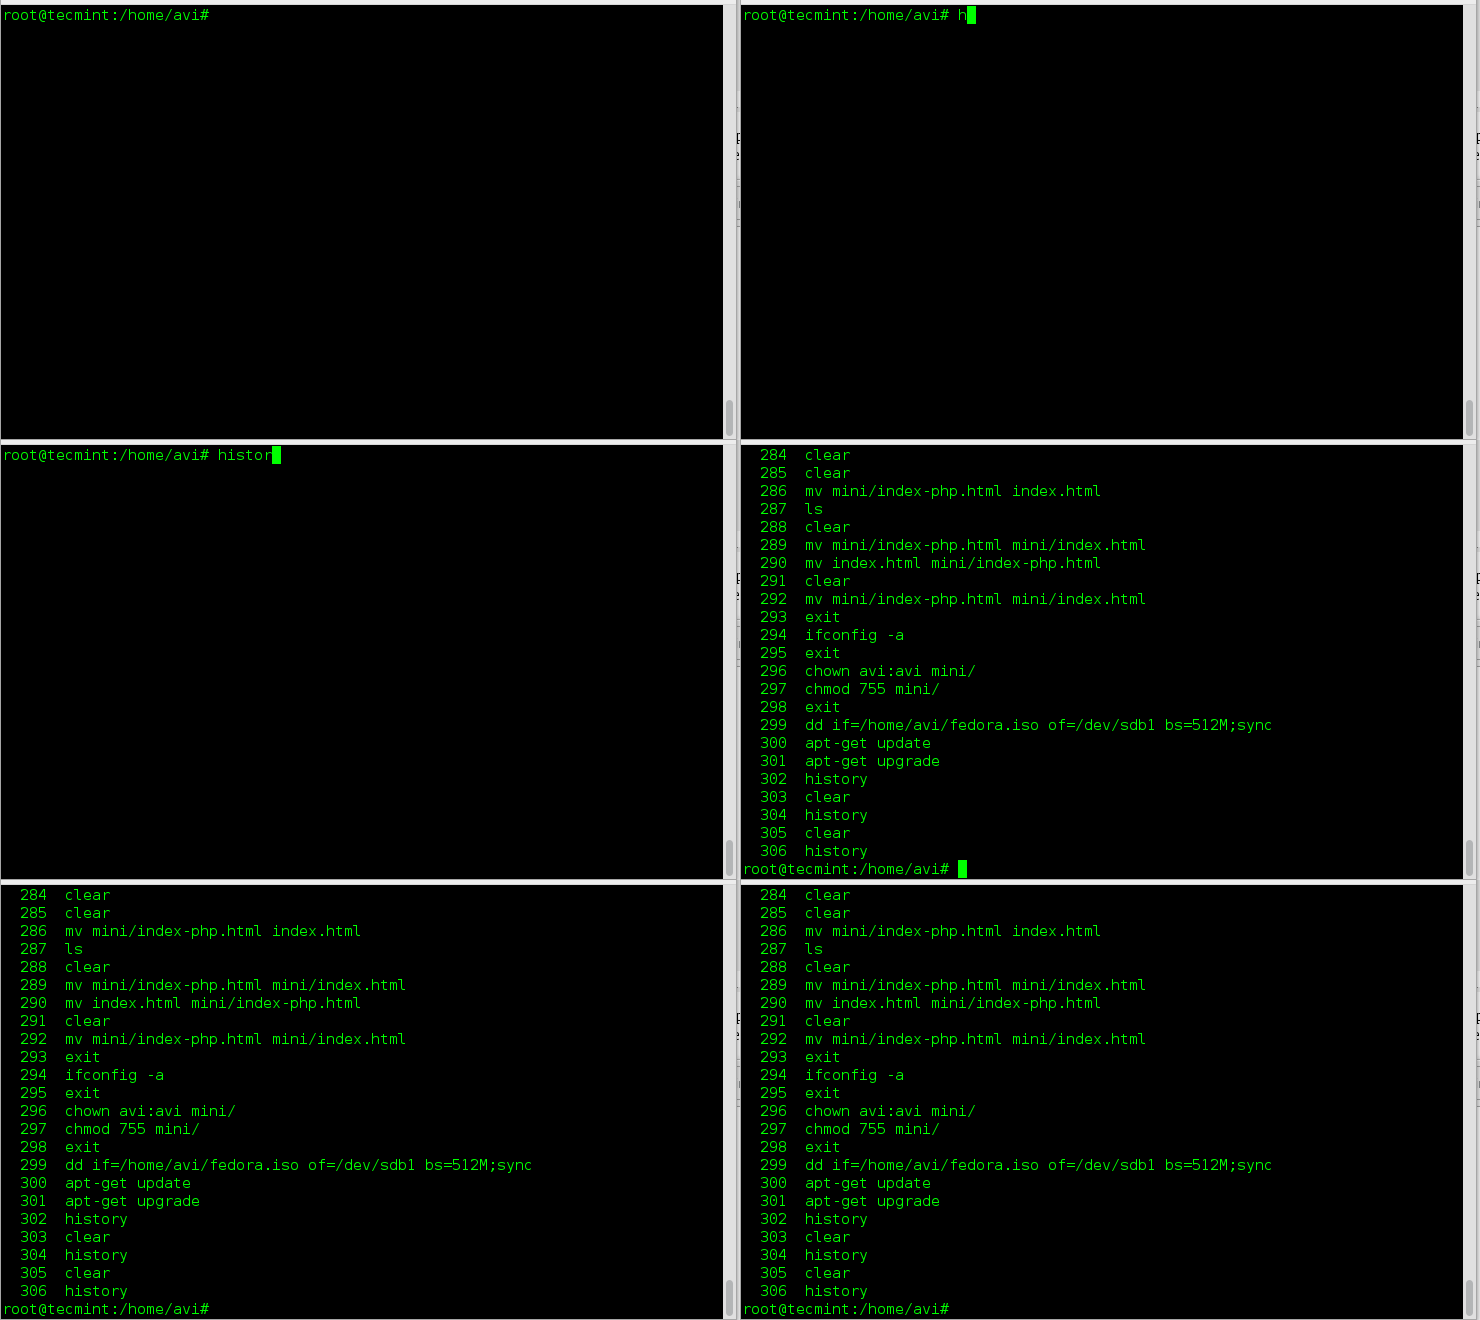
history command example
# HISTTIMEFORMAT="%d/%m/%y %T "
# history
If you want to permanently append this change, add the below line to
~/.bashrc.export HISTTIMEFORMAT="%d/%m/%y %T "and then, from terminal run,
# source ~/.bashrcExplanation of commands and switches.
- history – GNU History Library
- HISTIMEFORMAT – Environmental Variable
- %d – Day
- %m – Month
- %y – Year
- %T – Time Stamp
- source – in short send the contents of file to shell
- .bashrc – is a shell script that BASH runs whenever it is started interactively.
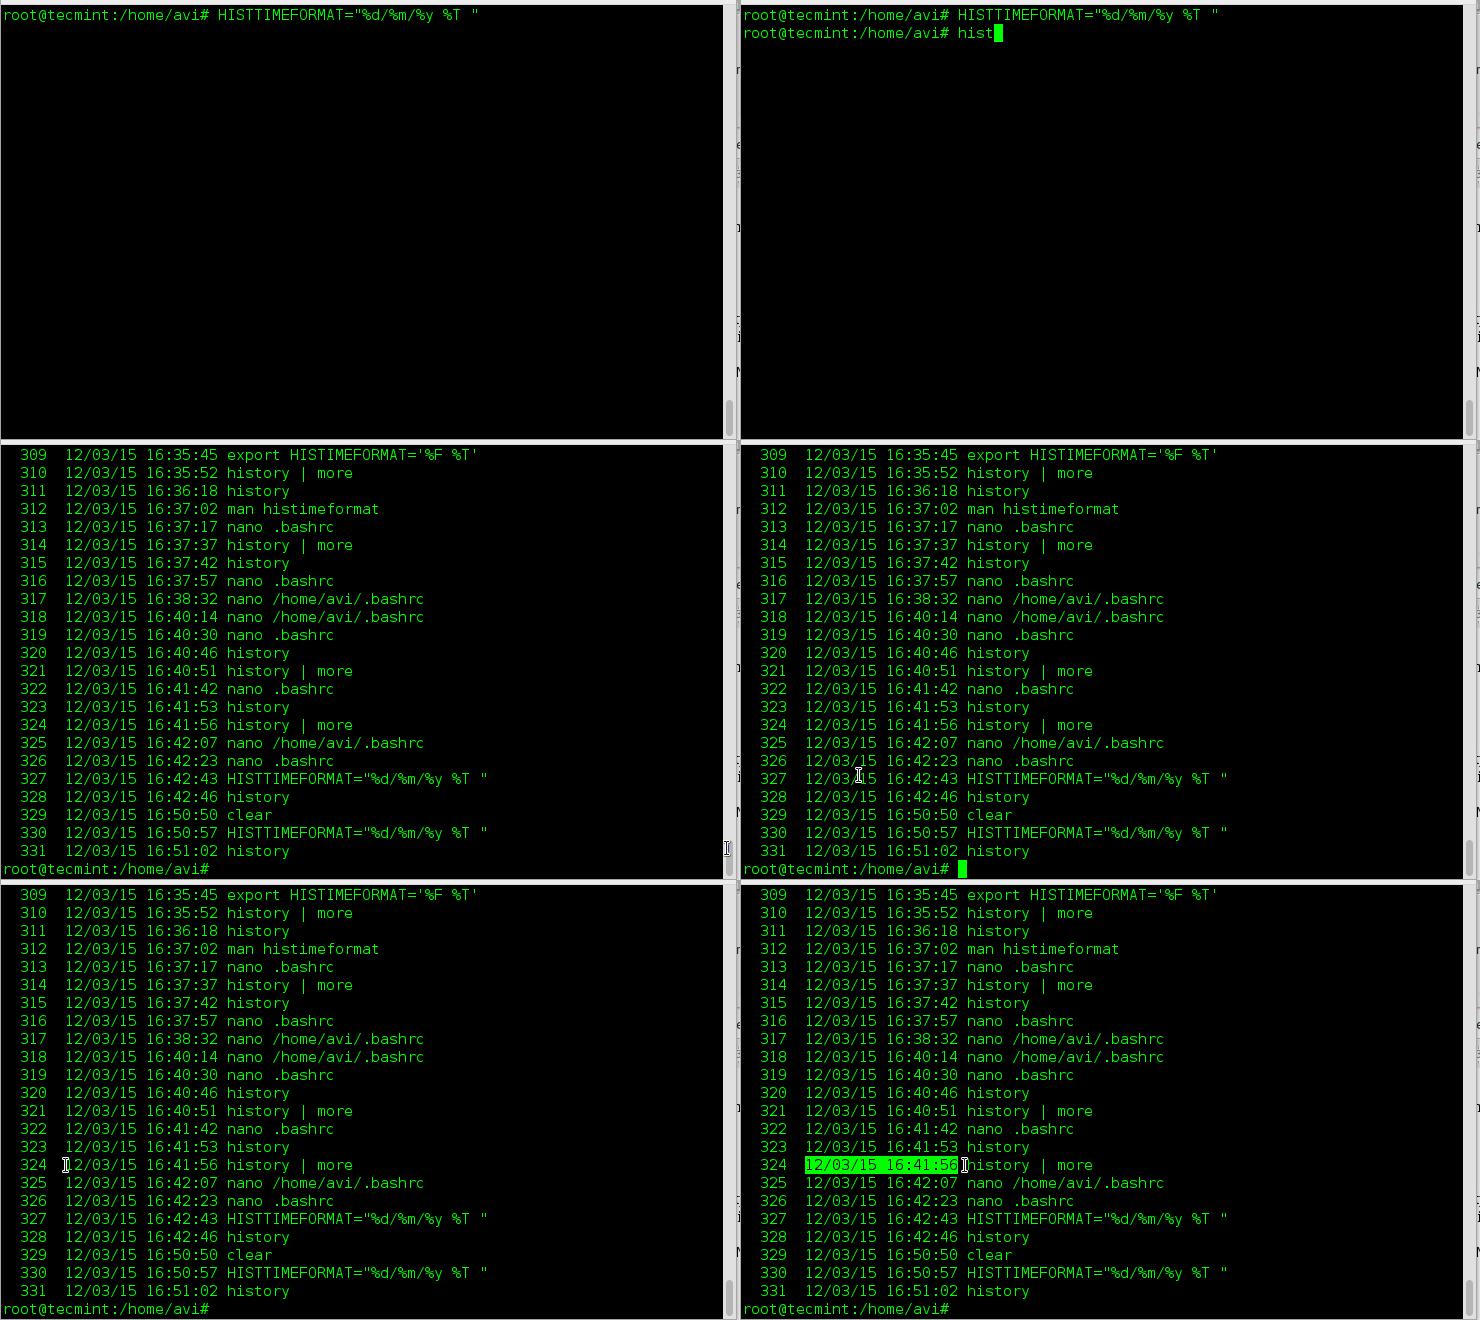
history Command Logs
# dd if=/dev/zero of=/tmp/output.img bs=8k count=256k conv=fdatasync; rm -rf /tmp/output.img
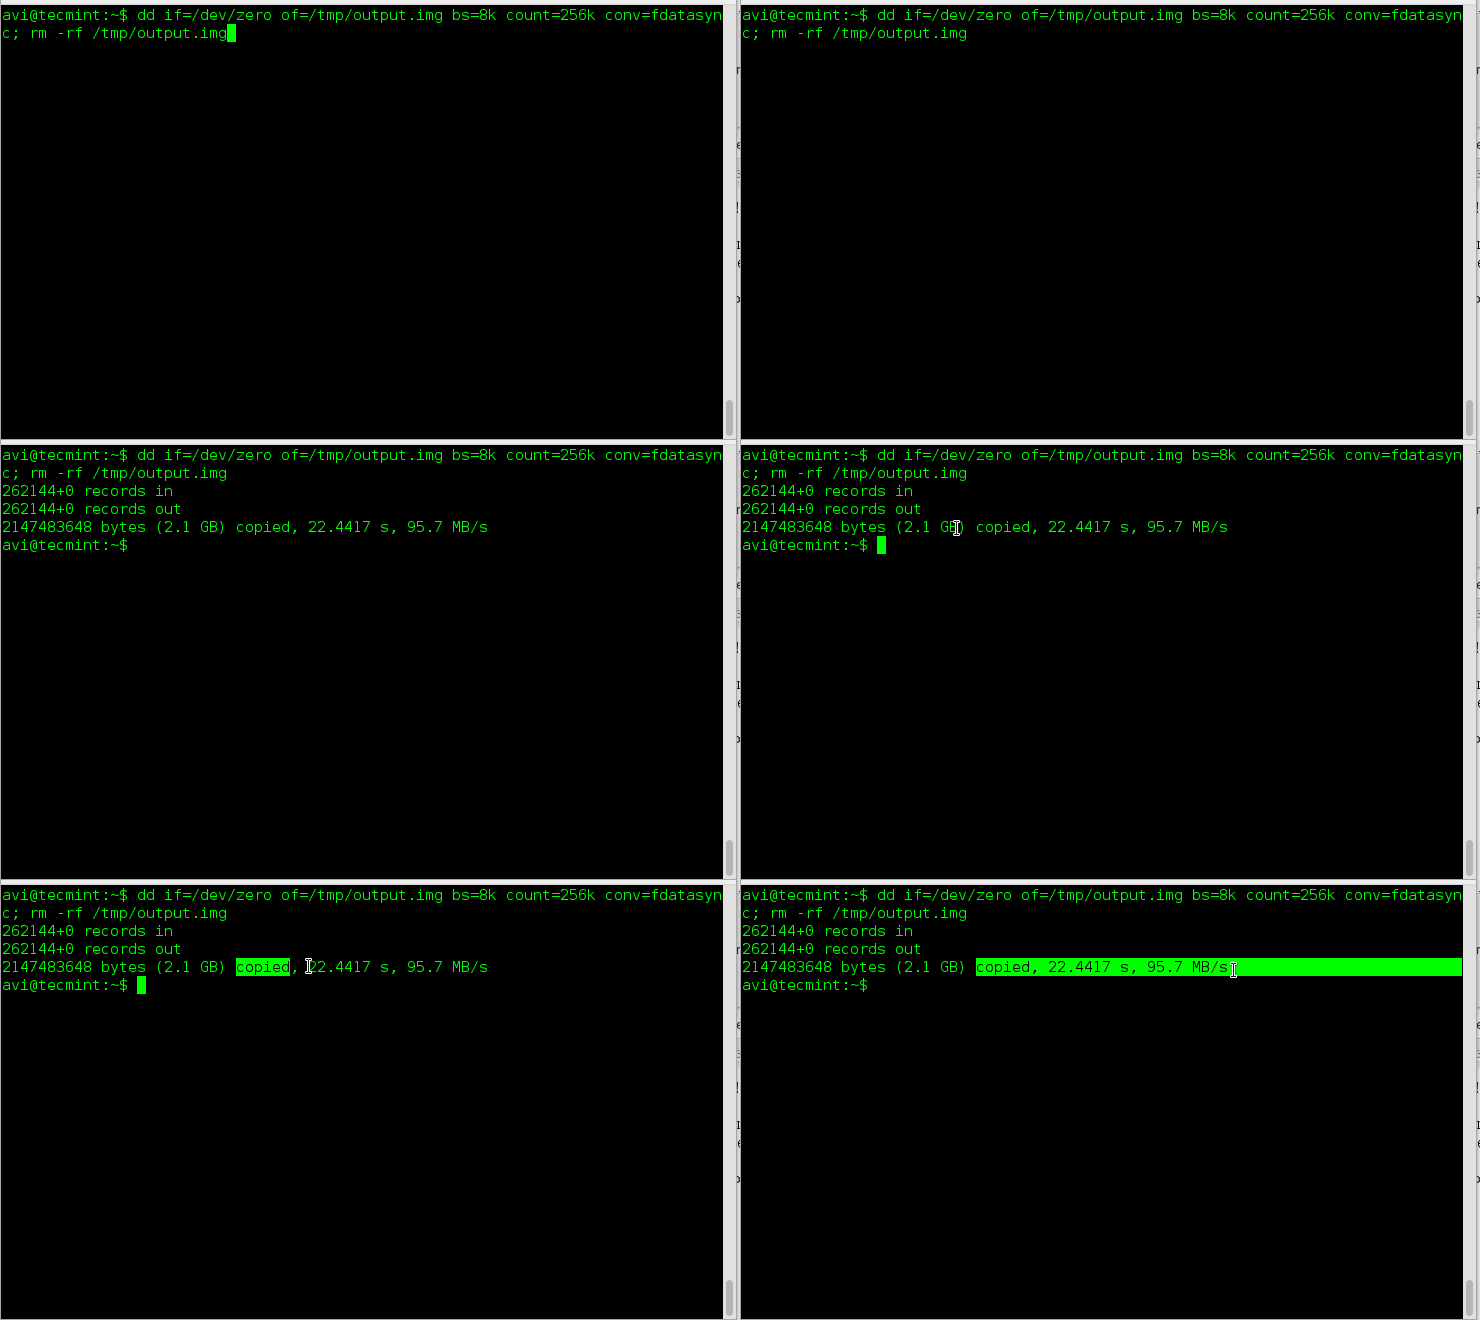
dd Command Example
- dd – Convert and Copy a file
- if=/dev/zero – Read the file and not stdin
- of=/tmp/output.img – Write to file and not stdout
- bs – Read and Write maximum upto M bytes, at one time
- count – Copy N input block
- conv – Convert the file as per comma separated symbol list.
- rm – Removes files and folder
- -rf – (-r) removes directories and contents recursively and (-f) Force the removal without prompt.
# du -hsx * | sort -rh | head -6

Check Disk Space Usage
- du – Estimate file space usages
- -hsx – (-h) Human Readable Format, (-s) Summaries Output, (-x) One File Format, skip directories on other file format.
- sort – Sort text file lines
- -rh – (-r) Reverse the result of comparison, (-h) for compare human readable format.
- head – output first n lines of file.
# stat filename_ext (viz., stat abc.pdf)

Check File Statistics
# man $(ls /bin | shuf | head -1)
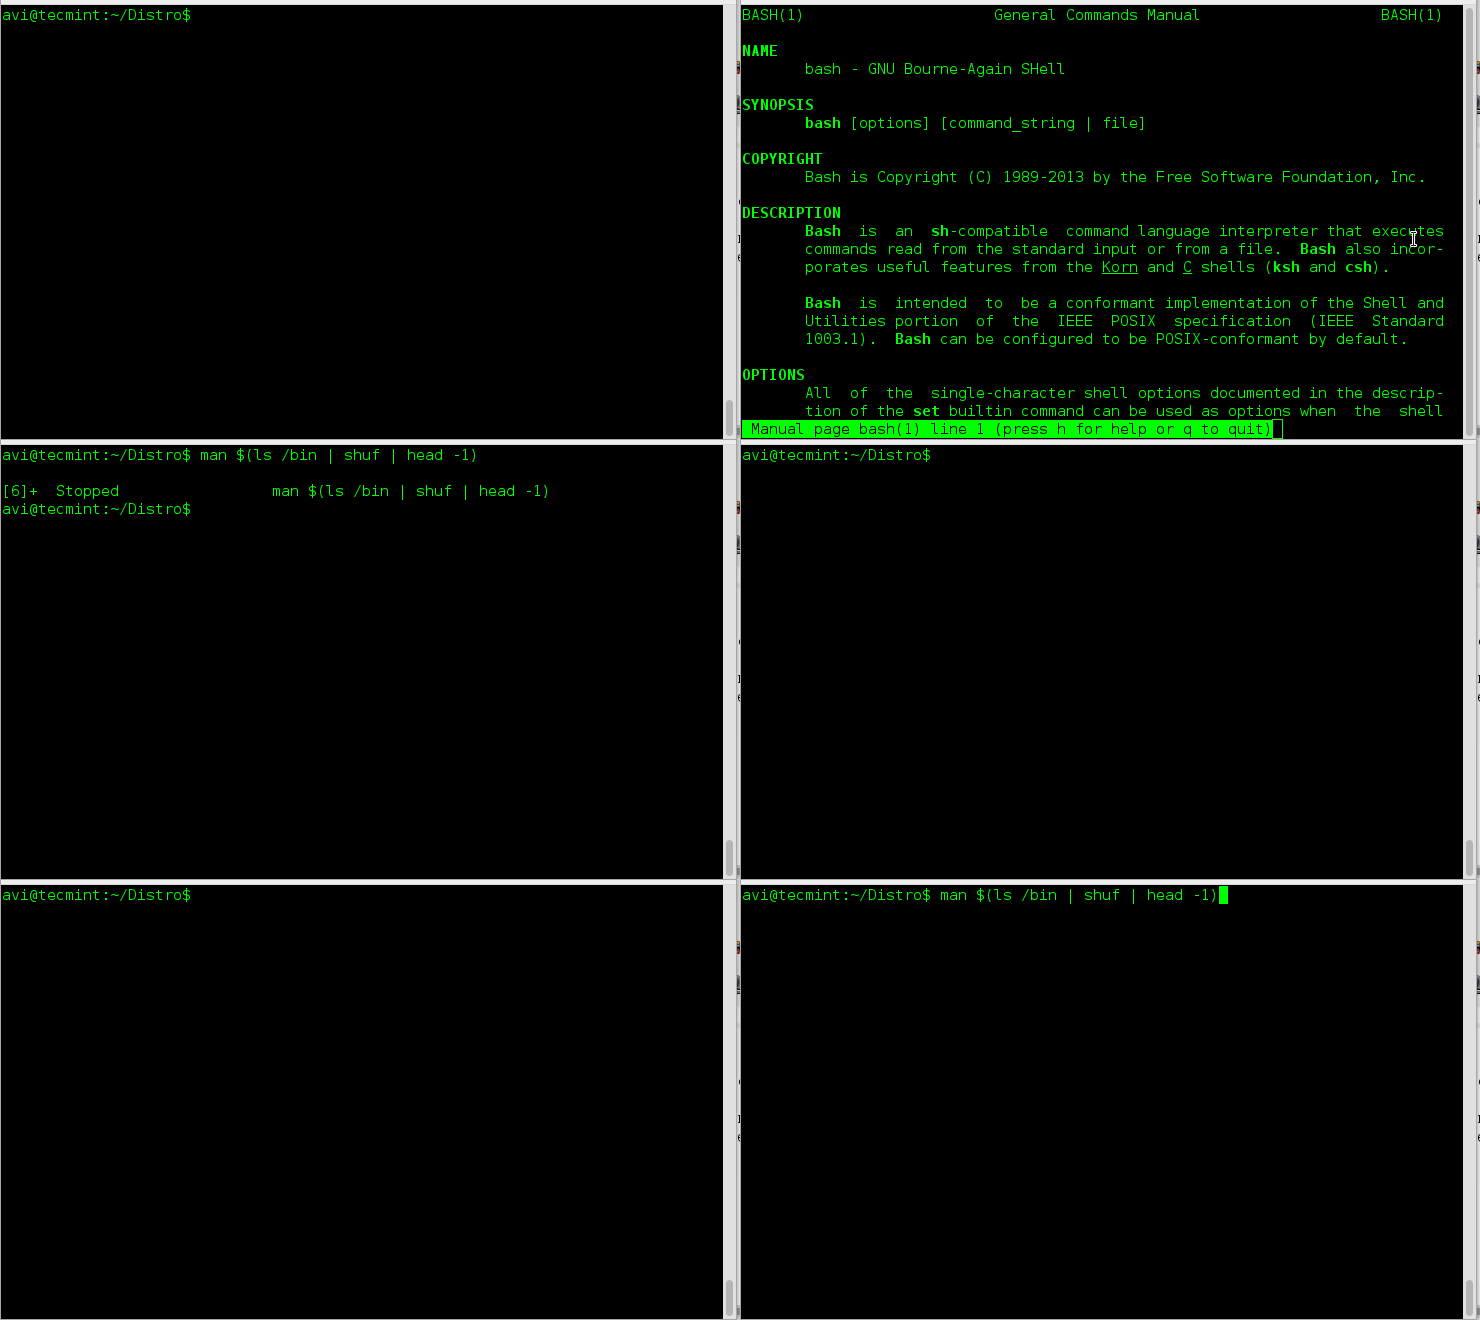
Generate Random Man Pages
- man – Linux Man pages
- ls – Linux Listing Commands
- /bin – System Binary file Location
- shuf – Generate Random Permutation
- head – Output first n line of file.
Tuesday, 18 August 2015
Tips for buy a laptop
 When
you need to buy a laptop, how do you select the right one? For most
people, we believe, it starts with the processor. How many cores it has?
Whether it is the Core i3 or Core i5? Then, people want to know what is
the speed of the processor and how much RAM is installed in the laptop.
Then comes the amount of internal storage (hard disk) available inside
the laptop. Finally, it is down to the weight and looks.
When
you need to buy a laptop, how do you select the right one? For most
people, we believe, it starts with the processor. How many cores it has?
Whether it is the Core i3 or Core i5? Then, people want to know what is
the speed of the processor and how much RAM is installed in the laptop.
Then comes the amount of internal storage (hard disk) available inside
the laptop. Finally, it is down to the weight and looks.If a consumer likes the processor, amount of RAM, available internal storage and finds looks of laptop appealing he buys it. Of course, if the price is right.
But this is a wrong way to buy a laptop.
Over the years, companies -- and their sales people -- have misled consumers a lot by talking about components like processor and RAM and asking them to buy laptops on the basis of whether it has a Core i3 or a Core i5. But it is time you stop listening to the sales people and get a bit more proactive in how you choose your laptops. We tell you what you need to look for in your next laptop.
What is not important
Processor: Unless you are looking for a specialised laptop like a gaming laptop or a machine on which you want to 3D modeling, processor is no longer all that important. In the last few years processors have become very powerful. Nowadays, most of the general-purpose programs like a web browser don't even use 20 per cent processing power of a lowly Core i3 processor. Machine like MacBook Air that are utterly fast use just dual-core processor running at 1.4GHz. While buying a laptop, don't worry about processor. Yes, Core i7 is usually better than Core i5. And Core i5 is better than Core i3. But even if you are getting Core i3, it is more than enough for a general-purpose machine.
Amount of RAM: Nowadays, all laptops have 4GB RAM. And that is all you need. If you can get more, go for it. But don't buy a laptop just because it has 8GB RAM. There are more important things that you should factor in instead of going after RAM.
Graphics card: Are you going to play demanding games like Battlefield 3 on your laptop? No. Ok, then don't worry about graphics card. There was a time when integrated graphics chip used to be really weak. A graphics card made sense at that time. Nowadays, if you are looking for a laptop on which you can browse web and watch videos, don't worry about graphics card.
Screen size: Don't buy a laptop just because it has a large screen. A large screen with poor quality display or low resolution is going to affect your computing experience negatively. Instead, go for a better screen even if the size is small.
How fast it starts: Almost all new laptops start in less than 30 seconds. The worst ones will take around 30 seconds, the best ones (with SSD) will take around 15 seconds. But that is only when they are new. Gradually, they will start taking longer because as you install more and more programs, the start-up process begins to clog up. But that is not the point. The point is that often the difference between the best and worst laptops when it comes to the boot process is around 5 to 10 seconds. Is it this such a big deal that it should influence your buying decision? Laptop companies will say yes. We say no.
Ultra-fast DVD drive: Laptop makers love to hype up DVD drives in their machines. They use phrases like "super multi double layer". The reality is that it doesn't mean much. Whether super or not, almost all DVD drives in laptops nowadays write and read stuff at similar speed. Despite the grand words that describe them, these drives are dirt cheap and probably come out of same factories in China irrespective of their brand name.
Security features: Don't bother about fingerprint scanners etc in your laptop. Once you have bought your machine, just put a decent password on it and your data is all safe. That is if you are a mainstream user. If you deal with the nuclear launch codes, then it doesn't apply to you. In this case, trust your IT guys to give you the right machine.
What is important
Quality of screen: What is the most important component in a laptop? If you say processor, you are wrong. The most important component in a laptop is its screen. Reason: Screen is something that is going to define your computing experience. It is your window into computers and the work they do. A bad screen means bad experience.
Unfortunately, it is rather difficult to find laptops with good screens. Blame laptop manufacturers for this. They often hype processors but ignore screens.
If you are spending a lot of money on your laptop -- something like above Rs.75,000 -- try to get a laptop that has IPS screen. Most laptops have TN panel screens. What is the difference? Here is an easy way to understand: Have you noticed that your photos look better on a Galaxy tablet or on iPhone compared to how they look on most laptops? That is because most tablets and phones use IPS screens.
If you are not spending this kind of money, at least pay attention to the screen. Visit a laptop show and check out the specific laptop model you have in mind. Carry a pen drive full of some colourful photos with you. Plug this into the laptop and see how the colours look. Do the colours in your photographs look faded or do they look vibrant? Vibrant colours are good. Also, tilt the screen, move the laptop, change the angle of your view, and see how fast colours fade or darken. If the colours don't change much, the laptop has a good screen.
Equally important is the brightness of the screen, particularly if you are going to use the laptop outdoors. Ideally, 60 per cent brightness level should make the laptop screen look good. If you have to bump up the brightness to 80 or 90 percent, the screen is not bright enough.
Finally, watch out for the resolution of the screen. Higher resolution screens make images and text look sharper. Ideally, go for a laptop that has 1080P aka FullHD or 1600 X 900 pixels resolution.
Keyboard and touchpad: Two very important parts in a laptop but often overlooked by consumers. Good laptops have typing keys that are firm, don't rattle and give a kind of clicky or pushy feedback when they are pressed. Also, the keyboard should not flex and the size of keys should be big enough to make typing comfortable. Ideally, type 100 to 200 words on a laptop that you want to buy to get a feel of the keyboard. Buy it only if the keys feel right to you.
Touchpad in a laptop has to be responsive. It should make the cursor on the screen move smoothly when you use it. It should feel smooth and responsive to your fingers. If you are spending lot of money on your laptop, go for a machine that has glass touchpad (hint: MacBooks have glass touchpad).
Good quality of keyboard and touchpad is often a sign of overall quality of the laptop. There is a chance that if a laptop has a good keyboard and smooth touchpad, it is likely to have good overall build quality.
Build quality: Don't go by looks. Pick up a laptop and see how it feels in hands. Is the plastic used in it good? Is it sturdy? Do the screen hinges feel durable? Does the screen flex (it shouldn't)? See the finishing of the laptop. The build quality of a laptop is very important because that will determine how long it is going to last.
Ideally, go for laptops that have bodies made of metal like aluminum or magnesium alloy. Carbon fibre bodies are also fine. But these are expensive. If you are looking for plastic body laptops, go for those that feel sturdy and have impeccable finishing.
Speakers: Before you a buy a laptop, go to a store with a pen drive full of your favourite songs. Play these songs on the machine you want to buy. If your laptop has a good set of speakers, it will help you enjoy the YouTube videos. Don't you want that?
Weight: This is particularly important if you want to carry around your laptop. Go for lighter laptops -- under 2kg -- if you are going to carry it around in your bag.
Battery life: Very important. Go for laptops that offer to claim better battery life. Unfortunately, except Apple no one really advertises true battery figures for their laptops. But still if someone claims to give 10 hours battery life in a laptop, it is likely that the machine will last for at least 7 hours, which is better than the laptops claiming to give 6 or 7 hours of battery life.
SSD or embedded flash storage: If you don't need tons of storage (hint: you don't if you are not going to store movies) go for laptops that have SSDs. A SSD really makes a difference to how well a laptop responds. A laptop with Core i3 processor and a SSD will feel faster compared to a laptop with Core i7 and a 1TB hard disk. If SSD-equipped laptop is out of question, go for a machine that has embedded flash storage (around 20GB or more). The embedded storage helps laptop feel faster. This type of laptop won't be as fast as one with SSD, but it will be quite close.
One last thing: When it comes to buying a laptop, don't go by the specification sheet that a salesman will give to you when you walk into a store. Go by what you see. The components like screen, keyboard, touchpad and the laptop body that you can see are more important. The internal hardware is more or less same in every laptop in a particular price bracket.
Sunday, 9 August 2015
How to Get Clear Skin at Home
Your skin care regimen and lifestyle habits are the primary predictors of your skin’s health. Some of the leading factors that take a toll on the quality and texture of your skin are stress, lack of sleep, poor nutrition, pollution, damage from the sun’s ultraviolet rays, excessive smoking and drinking alcohol.
There are thousands of skin and beauty care products that promise to give you clear and glowing skin. Instead of relying on these products, you can try some simple and easy home remedies to improve the overall health and appearance of your skin.

1. Lemon
Lemon is one of the best ingredients that you can use to promote clear skin. The citric acid present in lemon helps keep the skin clear by removing dead cells, and its vitamin C content helps reduce dark spots by increasing the cell renewal process. Lemon also has bleaching properties that will help improve your overall skin complexion.- Apply fresh-squeezed lemon juice to your entire face and neck. Leave it on for 10 minutes and then wash it off with lukewarm water. After this, rub cucumber slices on your skin to soften and moisturize it. Do this daily or every other day.
- Another option is squeeze the juice of one-half lemon and mix one to two tablespoons of raw honey in it. Apply it on your face, leave it on for 15 to 20 minutes and then rinse it off.
- To exfoliate your skin, mix two teaspoons each of lemon juice and sugar. Apply the mixture on your face, neck and hands. Scrub in a circular motion and leave it on for 10 minutes. Then rinse it off with lukewarm water. Follow this remedy once a week to enjoy glowing skin.
2. Turmeric
Turmeric is an excellent antiseptic and skin-lightening agent that helps minimize scars and other marks. Plus, turmeric can alleviate allergic, inflammatory and infectious skin disorders that make your skin look dull and lifeless.
- Mix one tablespoon of turmeric powder with enough pineapple juice to make a paste. Apply the paste to your face and neck. Leave it on until the paste dries completely. Then wash it off with lukewarm water. Follow this remedy two or three times a week to reduce the appearance of spots on skin.
- Make a paste by mixing equal amounts of turmeric powder and gram flour with a little water or milk. Apply it evenly on your skin and leave it on until it dries. Wash it off with lukewarm water, scrubbing your skin gently in a circular motion. Follow this remedy once a week to lighten your skin tone and remove scars.
3. Honey
To enjoy clear skin, your need to keep your skin well moisturized. Honey is a great moisturizer and also has antibacterial properties that help ward off infection.- Apply raw honey directly on your skin. Let it dry naturally and then rinse it off with lukewarm water. The water content in honey will deeply moisturize the skin, making it soft and supple. Do this simple remedy once daily or every other day.
- Alternatively, mix two teaspoons of milk and one teaspoon of honey. Then add one teaspoon of gram flour and mix it in well. Apply it all over your face. Leave it on for 20 minutes and then rinse it off with warm water. Use this face mask once a week to enjoy radiant and clear skin.
4. Aloe Vera
Aloe vera has many benefits for the skin. It has antibacterial properties that help kill bacteria that cause acne, anti-inflammatory properties that help soothe irritated skin, and astringent properties that help heal scars. Plus, aloe vera moisturizes the skin and stimulates new skin cell growth.- Extract the gel from an aloe vera leaf.
- Apply the gel on your face using a cotton ball.
- Allow it to dry on its own for about half an hour, and then rinse it off with lukewarm water.
- Follow this remedy daily or several times per week.
5. Baking Soda
Baking soda balances pH levels of the skin, which is very important to maintain clear skin. Plus, its mild antiseptic and anti-inflammatory properties help deal with problems like acne, pimples and spots. It also works as an excellent exfoliating agent to keep the skin free from dirt, impurities and dead skin cells.- Mix one teaspoon of baking soda with one teaspoon of water or lemon juice to make a paste. Cleanse your face and use the paste to gently exfoliate the skin. Finally rinse your face with lukewarm water and pat it dry with a towel. Follow this remedy two or three times a week.
- Alternatively, mix one teaspoon each of baking soda and raw honey. Apply this mixture onto damp skin and massage gently for just one minute. Then wash with lukewarm water. Finally, splash some cold water on your face to close the pores. Follow this remedy once a week.
6. Cucumber
Cucumbers contain hydrating, nourishing and astringent properties that are very good for skin. They can improve the overall appearance of your skin by repairing damaged skin cells, removing dead skin cells and adding a fresh glow.- Cut a fresh cucumber into thick slices, and rub them thoroughly all over your face. Leave it on overnight and rinse with warm water in the morning. Do this daily before going to bed.
- Alternatively, make a mixture with equal amounts of cucumber juice and lemon juice. Apply this mixture to your skin, allow it to dry completely, and then wash it off with warm water. Do this daily.
7. Papaya
Papaya can be used to improve your skin’s texture and maintain clear skin. It has natural bleaching properties that help reduce the appearance of scars. Plus, the enzyme papain present in papaya has antibacterial and wound healing abilities and also aids in removing dead, damaged skin.- Chop a ripe papaya into small pieces.
- Combine the papaya with one teaspoon each of sandalwood powder and honey. Grind these ingredients into a paste.
- Apply the paste all over your face and neck.
- Leave it on for half an hour. Then rinse it off with cool water and pat dry your skin.
- Finally apply some rose water on your face.
- Follow this remedy once a week to notice a visible change in your skin tone.

8. Walnut

Walnuts can bring a beautiful glow to dull, dry and lifeless skin. Walnuts have antioxidants that help repair skin cells and promote radiant skin. Walnut in powder form can be used to exfoliate your skin and remove impurities and dirt that an ordinary cleansing product cannot do.
- Mix two teaspoons of walnut powder with two tablespoons of plain yogurt to make a paste. Apply this paste on your face and neck. When the paste dries, scrub the mixture around your face and then rinse it off with lukewarm water. Use this face mask once a week.
- Soak three walnuts in water overnight. In the morning, mix in one teaspoon of rose water to make a paste. Apply the paste on your face. Leave it on for an hour and then rinse it off with lukewarm water. Follow this remedy once a week.
- You can also eat two or three walnuts with a glass of milk every morning.
Tips to Simplify Your Web Design
Simplicity rules! It makes a websites look
sleek, reduce nagivation confusion and it helps achieving desired goals
and results (I.e., more signups, subscribers and sales). But too often
it seems elusive to simplify your website design. No matter how hard you
try, you can’t make your work look like Apple’s. So what does a website designer really needs to do? Fret not, for there are 5 starting points to simplify your website design.
This isn’t a technical step but a principle that you can use as your guide to simplify your website design constantly. The 80-20 rule will help simplify your website design by pushing you to trim your site elements down to the essentials. What’s really cool is that the 80-20 rule can also help increase your desired results that you hope to achieve on your website. For example, an increased conversion rate in visitors subscribing, signing up, or buying. How? You’re making it so there are less distractions and things for visitors to click on to leave the page.
As we all know, we’re always looking for an excuse not to purchase something at the final step, and any reason to navigate away is a good one. Reduce those reasons and click-away options with the 80-20 rule.
Chris Pearson, creator of the popular Thesis WordPress theme framework, says this is exactly what helped increase sales on his website.
Now that you’ve identified the 20% of website elements that will get you 80% of your desired results, it’s time to get rid of all unnecessary elements. In other words, the 80% of website elements that will get you only 20% of results. It could be social media sharing widgets, sidebar elements, blog post meta details (date, time, author, number of comments, etc), or links in the footer (this is especially a huge culprit a lot of the times, particularly when the visitor is looking for the aforementioned excuse to navigate away from the page).
Firstly, get in the mindset of the visitor – if you were to arrive on your website, what are the key things would you want to do? For instance find out what your stuff is about? Or contact you? Next, make sure that your pages facilitate what is necessary and nothing more. Don’t keep unnecessary pages on your website because you think you need to, or because other websites have them. When you reduce the number of pages on your website, not only it is easier for your visitors to focus on your content because there’s less places to click around, but your navigation menu is simpler too.
We’ve all been on websites with too many nav menu items. We don’t know where to start navigating because we get overwhelmed by the choices. And when we get overwhelmed by being presented with too many choices, we go with choosing nothing. By having as few nav menu items as possible, you make your website not only simpler but more inviting and friendlier to visitors.
I’m as guilty as anyone with getting wild with colors in the past. I’ll add this color, then another, and another – and before I know it, it looks like a rainbow diarrhea all over my website. You can have your website constructively simplified, but if the colors distract the eyes when you look at it rather than complimenting the content, then all that effort was for naught. So use fewer colors with your website design instead.
Having trouble choosing a color to start with? Before & After magazine has a useful free e-book on how to find the perfect color here. Need help with picking a color scheme? Try out this handy color scheme generator.
1. Focus Only On Essential Elements :-
This first step probably seems forehead-slapping obvious: of course I should put the focus on the essential elements in my site, what am I, an idiot? But a surprising number of websites fail to achieve this and the result is a big mess of important and unimportant elements spewed onto a page. I’m as guilty of doing this in the past as anybody. It’s hard to be objective and prioritize what’s important or not, because everything seems essential. If you want your website design to be simpler, identify what needs to be focus, just like with any good visual design or piece of art. And that means putting the focus only on the essential elements.
Use the 80-20 rule
What 20% of what’s on a page gives 80% of the value and content that people go there for? It could be the copy, some social proof (review snippets, testimonials, media badges), and a signup form or call-to-action button, for example. That’s the 20% right there. On your website, as well as on each individual page, focus on displaying only the 20% of site elements that are delivering 80% of that usefulness.This isn’t a technical step but a principle that you can use as your guide to simplify your website design constantly. The 80-20 rule will help simplify your website design by pushing you to trim your site elements down to the essentials. What’s really cool is that the 80-20 rule can also help increase your desired results that you hope to achieve on your website. For example, an increased conversion rate in visitors subscribing, signing up, or buying. How? You’re making it so there are less distractions and things for visitors to click on to leave the page.
As we all know, we’re always looking for an excuse not to purchase something at the final step, and any reason to navigate away is a good one. Reduce those reasons and click-away options with the 80-20 rule.
Chris Pearson, creator of the popular Thesis WordPress theme framework, says this is exactly what helped increase sales on his website.
2. Get Rid of All Unnecessary Elements
We’re continuing with the 80-20 rule here.Now that you’ve identified the 20% of website elements that will get you 80% of your desired results, it’s time to get rid of all unnecessary elements. In other words, the 80% of website elements that will get you only 20% of results. It could be social media sharing widgets, sidebar elements, blog post meta details (date, time, author, number of comments, etc), or links in the footer (this is especially a huge culprit a lot of the times, particularly when the visitor is looking for the aforementioned excuse to navigate away from the page).
3. Reduce the Number of Pages
A large part of simplifying your website design is to simply have fewer places to explore and click around. You can do that by trimming the page count. Either get rid of unnecessary pages that deep down inside you know aren’t needed, or at the very least, fuse multiple pages into one. I mean, you don’t really need to separate "about the site" and "about me" pages.Firstly, get in the mindset of the visitor – if you were to arrive on your website, what are the key things would you want to do? For instance find out what your stuff is about? Or contact you? Next, make sure that your pages facilitate what is necessary and nothing more. Don’t keep unnecessary pages on your website because you think you need to, or because other websites have them. When you reduce the number of pages on your website, not only it is easier for your visitors to focus on your content because there’s less places to click around, but your navigation menu is simpler too.
We’ve all been on websites with too many nav menu items. We don’t know where to start navigating because we get overwhelmed by the choices. And when we get overwhelmed by being presented with too many choices, we go with choosing nothing. By having as few nav menu items as possible, you make your website not only simpler but more inviting and friendlier to visitors.
4. Get More Content Above the Fold
Studies have shown that a majority of people spend most of their time above the fold on web pages (what shows up on the screen without scrolling down). So if you want to increase the effectiveness of your website, have the main content and call-to-action elements above the fold. You can do something as simple as shortening the header height if you have a logo and a navigation menu at the top of your website.
This involves nothing more than changing the header’s "height" value in your stylesheet (typically style.css or stylesheet.css).
Also, see if a sign-up form or button is below the fold. Move that
element higher up in the page so it’s the first thing a visitor sees.
After all, that is your desired call-to-action of the visitor, so decrease the work needed to get to it (ie. scrolling).5. Limit Your Color Scheme
It’s easy to get carried away with colors. Why settle on 2 or 3 colors when you can have 12 or 13? But in order to simplify your website design visually, you need to limit your color scheme. When in doubt, use fewer colors. It’ll vary based on your design of course, but try sticking with no more than 2 or 3 colors to start off. If you need more subtlety and texture to your visual design, use shades of the same color – light blue for the background and darker blue for header and menu items.I’m as guilty as anyone with getting wild with colors in the past. I’ll add this color, then another, and another – and before I know it, it looks like a rainbow diarrhea all over my website. You can have your website constructively simplified, but if the colors distract the eyes when you look at it rather than complimenting the content, then all that effort was for naught. So use fewer colors with your website design instead.
Having trouble choosing a color to start with? Before & After magazine has a useful free e-book on how to find the perfect color here. Need help with picking a color scheme? Try out this handy color scheme generator.
Saturday, 20 September 2014
Candy Crush Saga Tips
1. Find the patterns!
There are things that will make a sprinkle donut hole or special candy effortlessly. Recognizing and repeating them allows you to wipe the board and earn your ticket to the next level faster. I'm always looking for these patterns. I memorize which patterns lead to which special candy and then set them up whenever possible and as needed.
2. Start at the bottom
Crushing candies on the bottom is better than crushing candies at the top, because candies drop down, creating the potential for a cascade effect that essentially gives you free moves.Go for combos
The two best combinations are the wrapped candy and the striped candy, and the sprinkle donut hole and the striped candy. Together, they can wipe out over half the board for you. This can also help you get to places which are off the board or otherwise difficult to reach. This is the only way you will get by levels such as 181, which have unreachable squares. Also, a wrapped candy switched with another wrapped candy will ignite a 6 by 4 square which can clear a huge area.
4. Know your stripes!
Candy is striped in the same direction as the final candy moved to complete the previous formation. If you move a candy horizontally, it will make a horizontal stripe, which will then explode horizontally as well.
5. Assess your threats!
Assess your threats. Prioritize getting rid of evil candy by their threat levels. For example, I usually make it a rule to kill low number bombs first, then chocolate, then go after the blocks.6. Clear jellies on the edge!
Clearing jellies on the edge. When getting rid of jellies, only worry about the edges, especially the corners and bottoms. These jellies have the least number of combinations which can eliminate them, so will be the hardest to get rid of. Take a moment each move to see if you can get rid of edge jellies and, if not, go after an easier one.7. Have a plan!
Have a plan. Each time you start a new level, look at the hardest element on that level and think out how you can defeat it first before you use up lives. Also, pause between moves. You may have a sprinkle and not even realize it if you're watching the candies from a lesser move get crushed.8. Understand chocolate!
Understand chocolate. If you've eaten a piece of chocolate one round, chocolate will not regenerate the following round. This is a great way to keep chocolate at bay. Try to destroy chocolate each round so that it won't regenerate the next. You can clear the entire board of chocolate using this method, though in later levels there is a chocolate maker which will bring them back in vicious fashion. Chocolate will avoid special candy if it can. Chocolate will also not eat a fruit or nut, though it will absorb bombs.
9. Cheat time for extra lives!
If you don't use Facebook, there's still a cheat to get you extra lives. Turn the clock on your mobile device ahead 2 hours, and then keep playing to your hearts content. Go to Settings > General> Date & Time > Set Time Off > Set Date and Time > Add two hours forward and get 4 more lives in your game. You will eventually have to pay back the time, but schedule that for when you're sleeping anyway. Remember to change the time from PM to AM if you are going past midnight.
Thursday, 18 September 2014
Windows 8 key combinations tips
In these key combinations, hold down the Windows key (normally located between Alt and Ctrl) and another key, as described on this list.
- Press the Windows key to enter the tiled Start screen.
- The Windows key + M minimizes everything that's showing on the desktop.
- The Windows key + E opens Explorer for quick access to folders.
- On the Start screen, press the Windows key + D to instantly get to the desktop.
- The Windows key + Tab opens a list of currently running programs.
- The Windows key + Print Screen takes a screenshot and saves it in a Screenshots folder nested in your Pictures folder.
- To take a screenshot on a Windows 8 tablet, simultaneously press the Windows button and the volume-down button on the tablet chassis.
- The Windows key + Q opens a global search menu. Type what you're looking for and where you would like to look.
- The Windows key + W opens a search in your system settings to quickly locate and change system properties.
- The Windows key + F opens a file and folder search.
- The Windows key + Pause opens the system properties page to show you a quick rundown of your specs.
- The Windows key + "," (that's the comma sign!) makes all current windows transparent, giving you a peek at the desktop as long as you hold down the Windows key.
- The Windows key + "." (the period) snaps a window to the right or left side (toggling each time you press ".").
- The Windows key + R prompts the Run command—useful for quickly launching apps and other routines with a command prompt.
- The Windows key + X opens the Quick Access Menu, exposing system functionality such as the Command Prompt, Disk Management, File Explorer, Run, and more. Alternatively, you can right-click on the bottom right corner of the screen to spawn the Quick Access Menu.
- The Windows key + I opens the settings menu, giving you quick access to the Control Panel, Personalization, and your Power button, among other features.
- The Windows key + O locks orientation on devices with an accelerometer.
Saturday, 13 September 2014
Tip For Say No Without Burning Bridges
Many of us don’t like to say no to a coworker or a boss—for instance,
when the boss asks for a tighter deadline, or a team member needs a
longer one—because we’re worried about damaging the relationship. That’s
because it often feels synonymous with confrontation. And whether you
are conflict-averse or conflict-ready, your counterpart may not always
handle hearing no the way you’d hoped.
Some counterparts will to try to “yes the no,” even when you’re hoping for minimal friction, because they have learned early on not to take no for an answer and feel like pushovers if they do. Or he might get angry, push back, or go silent, because that’s how he always handles hearing no.
There may also be something about the circumstances that makes it particularly difficult to accept your no. For example, someone who might be able to deal with a no privately could be embarrassed to hear it in front of others and may want you to back down so she can save face.
With all of these obstacles, there is no single trick to saying no while keeping your relationship intact. You can, however, change your perspective on what you’re trying to do. Don’t look at it as a choice between confrontation and preserving a relationship. There’s a middle option: the neutral no.
A neutral no is steady, uninflected, and clear. It is mostly notable for what it is not: harsh, combative, apologetic, reluctant, or overly nice.
Going neutral may not be your default manner of speaking, but it is well within your reach. A neutral no protects you and your counterpart from the elements of no that are really hard on relationships, such as:
Giving false hope. If you say no tentatively, it’s easy for your counterpart to hope that you’ll change your mind. It sounds like your no is about to tip over into a yes, so your counterpart is encouraged to keep pushing. That false hope, even more than the no, may damage your relationship.
Weakening the no. People often argue their no backwards: they start with lightweight reasons, holding back the real reason why they’re saying no. But the little explanations are not persuasive and are easily batted aside. To limit frustration—and to avoid appearing disingenuous—give reasons with good weight up front.
By sticking with neutral, you are concentrating on the business end of no, not the personal. You should be aiming for a referee’s kind of neutral demeanor. A ref makes a call, regardless of strong feelings on both sides. His job is to give his decision and stay with it if challenged.
You can also speak directly about the friction between you and your counterpart. To address the situation, try saying something like: “It’s hard for me to tell you no. It must be hard for you to hear.” Use your own language, but check that what you say is steady, uninflected, and clear. If you get pushback, keep these points in mind:
Some counterparts will to try to “yes the no,” even when you’re hoping for minimal friction, because they have learned early on not to take no for an answer and feel like pushovers if they do. Or he might get angry, push back, or go silent, because that’s how he always handles hearing no.
There may also be something about the circumstances that makes it particularly difficult to accept your no. For example, someone who might be able to deal with a no privately could be embarrassed to hear it in front of others and may want you to back down so she can save face.
With all of these obstacles, there is no single trick to saying no while keeping your relationship intact. You can, however, change your perspective on what you’re trying to do. Don’t look at it as a choice between confrontation and preserving a relationship. There’s a middle option: the neutral no.
A neutral no is steady, uninflected, and clear. It is mostly notable for what it is not: harsh, combative, apologetic, reluctant, or overly nice.
Going neutral may not be your default manner of speaking, but it is well within your reach. A neutral no protects you and your counterpart from the elements of no that are really hard on relationships, such as:
Giving false hope. If you say no tentatively, it’s easy for your counterpart to hope that you’ll change your mind. It sounds like your no is about to tip over into a yes, so your counterpart is encouraged to keep pushing. That false hope, even more than the no, may damage your relationship.
Weakening the no. People often argue their no backwards: they start with lightweight reasons, holding back the real reason why they’re saying no. But the little explanations are not persuasive and are easily batted aside. To limit frustration—and to avoid appearing disingenuous—give reasons with good weight up front.
By sticking with neutral, you are concentrating on the business end of no, not the personal. You should be aiming for a referee’s kind of neutral demeanor. A ref makes a call, regardless of strong feelings on both sides. His job is to give his decision and stay with it if challenged.
You can also speak directly about the friction between you and your counterpart. To address the situation, try saying something like: “It’s hard for me to tell you no. It must be hard for you to hear.” Use your own language, but check that what you say is steady, uninflected, and clear. If you get pushback, keep these points in mind:
- Stay on topic. If you think you know why your counterpart is pushing back, you can speak to his concern honestly: “You have a lot invested in what you’re asking, and it looks like I’m personally blocking you.” You can also give a good reason for your refusal: “I see my job as balancing valid, but competing, needs. That’s my focus.” If that creates an opening for an argument, it’s OK to have the discussion. Saying no shouldn’t be a monologue.
- Stick with it. If you have a good reason for saying no, stay with it. For example, I knew a young woman who went into mediation over a faulty used car that she’d just bought. The person who sold her the car was a volatile counterpart who gave many reasons why he shouldn’t be responsible for returning the woman’s money or repairing the car. The young woman listened, and to each argument she replied, “I understand. In [this state] the seller is responsible for repairing or refunding the cost of a car that cannot pass inspection.” In the end, the seller paid, and even took the young woman out for lunch.
- Be realistic. People hoping to preserve a relationship often want to both say no and have their counterpart be happy. But the realistic response to hearing no is often anger, unhappiness, or concern. If we distort our message in trying for an unrealistic response, our counterpart is likely to miss the point and we will have to say no twice.
Wednesday, 10 September 2014
Moto G tips and tricks to enhance your experience
Let
us proceed into Moto G tips and tricks:
1.
Secure your smartphone
Anti-Theft made easy by your stock
android feature: What if your phone is lost?
Don’t worry we will help you with this issue and you need not make use of
third party Anti-Theft applications which involves tedious process to setup and
take much of your time to configure the settings. Instead you can locate your
device using Motorola’s own “Device ID’ system and even Google’s own Android
device manager. Your phone comes with Motorola device ID system, where you can
register your device. By doing this you can locate your device, if you lose it.
When you switch on your device for the first time, you will be asked to enter
your Google account details to activate Motorola device ID.
What if you skip this step? If you skip this one, you can begin the process by heading
over to Settings and selecting Motorola device ID there. You can also unlock
the phone from this menu as well. The path is Settings > Motorola device
ID.

You can use Android Device Manager
too to track your device without any great difficulty.Before going further into
details of Android device manager, we have a question for you. Do you know
about Android device manager? If you do not know then check it here – (https://www.google.com/android/devicemanager).
Login with your Google account to access the facilities such as remote locking
etc,. By using the Android device manager you can find your phone’s location if
it’s stolen or lost. You can even remotely erase data on your phone. You can
even make a call to your device even if the device is in silent mode and also
if the SIM card is replaced by a new one. You can even erase all the
confidential data that is present in the phone and you can lock your device
remotely. To enable this Android device manager in your phone, head over to Settings
> Security > Device administrators.
Also read: Hidden features in Android to get more from your device,
and tips to enhance Moto G battery life.
2.
Switch on developer mode in your Moto G
If you want to unleash the real
power of your Moto G then have a look at developer mode settings and
configuration. Google has hidden the developer options from Android 4.1 to
prevent first time smartphone users to damage there device, but it’s very easy
to switch it on. By tapping on build number for 7 times you can switch it on.
For enabling this feature head over to Settings > About phone >
Build number.

Settings
You will see a message that you have
enabled Developer options on your phone after tapping on build number and on
the settings menu you can see the developer options, allowing you to
access a whole number of new features.Be careful while playing around with the
enabled features.Stay away from them if you do not know much about them.If
you have any queries about any features please comment them and we will help
you out.

Developer options
3.
Improve your phone’s performance with ART runtime
You can see in the developer options
that Android uses Dalvik runtime by default. This runtime is described as
“just in time” compiler, which means it does all the application
processing when it’s required for the running process. Google is now looking to
employ ART runtime in it’s latest Android version, which is a “ahead of
time” compiler. Good news is that you have ART runtime option in your Moto
G, which is featured in KitKat but it is not enabled by default in Android
4.4. To enable this you have to enter the Developers menu which is being
described above. Now head over to settings, select Developer options, elect
runtime option there and here you will get two options which are use ART
and use Dalvik. Choose ART in it and your device will reboot after doing
this. After selecting the new runtime, you will see a message that applications
are being optimized for the new runtime. This whole process will take a few
minutes to complete and once the whole process is completed you can notice a
considerable performance boost on most devices.

Select runtime
We must warn you that very few
applications may be incompatible with the new runtime which is because some few
developers haven’t changed things accordingly. If you are having any problem
with one of the installed applications you use heavily on daily basis, the only
solution for you is to simply switching back to the Dalvik mode using the same
procedure.
4.
Take screenshot on your Moto G
Want to capture something important
on your phone? It’s simple. To take a screenshot simply press the volume down
and power button together. The resultant screenshot will be deposited in your
phone’s gallery and if you want to access it, head over to file manager and
select pictures in it. Find the screenshots folder in which you can find all
your screenshots.
5.
Enable lock screen widgets on your Moto G
Widgets are one of the outstanding
features of the Android operating system and these are not present in some of
its rival operating systems. However lockscreen widgets are one of Android’s
latest innovation which are available in your smartphone. To enable widgets on
lock screen in your device, head over to Settings, select Security and check
enable widgets option. Path is Settings > Security > enable widgets.

Lock screen widgets
Once you follow the above procedure,
you can enable widgets on your lock screen . On your lock screen simply swipe
from left to right and tap the “plus” icon that is present. You can choose from
the options like Google Now, Hangouts, etc., on the screen.
6.
Transfer data from your old phone to Moto G with Motorola Migrate
Android service allows you to store
all your data in the cloud, including emails, contacts, and app information.
But there are still some elements in your old phone, which don’t get
transferred properly. But don’t worry as Motorola Migrate app helps you in this
issue for data transferring. All you need to do is to install this app from the
Google Play Store and the whole process is so painless that you will keep
admiring it.
7.
If you want decent photos on your device – Use HDR mode
The Moto G’s camera is just okay,
not that good and nothing much to say about it.If you want to have some decent
photos on your smartphone, you can use the HDR mode on your device where HDR
stands for High Dynamic Range. The only disadvantage of the HDR mode on your
phone is that while shooting at night time you have to turn off this mode for
flash and it’s pretty slow. You can switch to HDR mode on your device
by swiping left to right on the edge of the screen in the camera application.
8.
Control your phone with your voice
Google Now – Android’s answer to
Siri, can be invoked or fired up with your simple voice command. It is
possible to activate Google Now, simply by saying “OK Google.” When you are on
the home screen or even in lock screen, simply say “OK Google” and you will be
prompted to give your next command, which can be anything from asking Google to
navigate to a place or to set an alarm or call someone etc..,

Google Now
The things you can do with Google
Now are ask for time and date, know about weather, getting directions,
get conversions, setting a reminder and notes, get flight information,
know sports information, searching web, call and messaging someone, setting an
alarm, play music, try these Easter Eggs( Do a barrel roll, what’s the
loneliest number, make me a sandwich, who are you, tilt, what does the fox say,
what is your favorite color ), and the newest feature is that you can
control your phone from lock screen. Just be wary of your friends shouting the
same phrase when you are trying these commands on your Moto G.

Google Now settings
9.
Get the stock Google UI on your Moto G
Do you love uncluttered stock
experience and do not have a nexus device with you? Don’t worry, you can
get the stock Google User Interface experience on your device by installing KK
launcher from the Google Play store. There are lot more options which can give
you this standard stock experience on your device. As your device runs on
Android KitKat there is an alternate for you. Download the APK file of
the Google Experience interface and install it on your Moto G, so that you can
get the Nexus phone experience. Make sure that you have switched on “allowing
third-party apps option” in the settings menu as standard Android OS
blocks third-party apps to provide security and prevent malware on your device.
10.Switch
launchers on your Moto G
The biggest advantage of Android is
the kind of customization it offers and this let it to gain an upper hand over
its rival Operating Systems. The ability to change launcher on your device
stands out when compared to other operating systems. By changing launchers on
your smartphone you can change the look and feel of your smartphone. Switching
between launchers is a bit difficult in the previous versions of Android.But in
the latest versions of Android, Google has added a quick and easy toggle in the
settings menu. There are a lot of launchers you could try out on your
device in the Google Play Store, which are Next, Nova, Apex etc..,

Launcher
When you install a new launcher on
your device you can switch between the launchers by heading over to settings,
select home and there you can select the launcher.
11.
Get instant help from Moto Care if you have trouble with your device
The Motorola Moto G comes with Moto
Care which helps you instantly if you face any sort of problems with your
device. It has got interactive tips, tutorials, and gives suggestions
based on usage of the device. You can also get help from customer care by
tapping the call or chat options and you can start an instant phone
conversation or online chat to get the help you need. You can also access
options such as FAQs, how-to’s, and Moto care tips. If you are new to Android
phone, this one will help you to get accustomed to your smartphone.
12.
Update all your Softwares for better performance and security
It is needless to say that each
firmware update brings features and fixes that improves the performance of the
device. Each and every update helps in better management of power resources on
your device. Most of the Motorola’s Moto G mobiles have been running on Android
KitKat 4.4.2 and Motorola has rolled out Android KitKat 4.4.4 for most of
countries around the globe. If you haven’t updated it on your device, head over
to settings > About Telephone > System Updates and check over
there for an update. You will get a message that your device has an update,
download it and install it. Once the installation process begins, your device
will be shutdown and the process continues and you will get a message that apps
are being processed. Once the whole process is completed you will see that your
device is updated to KitKat 4.4.4 after reboot.
13.
Selective Mobile Network
If you are not using the mobile data
on your device, why do you let it consume the precious battery? You can
change your device settings so that you can use only 2G networks for messages
and calls. If you want to browse or surf then switch to 3G network. You can
save a lot of battery by changing these settings. You can toggle between 2G
network and 3G network by heading over to, Settings > More > Mobile
Networks > Network Mode.
14.
Gain an easy speed boost on your Moto G by disabling animations
The animations that occur as you
move between applications and screens look pretty for you, but they bring down
your device performance and can slow down your smartphone.In most of the cases
they essentially force you to wait for a period of time.Even though it is small
it is considerable sometimes.

Window animation scale
You should be thankful to Google
because, it’s possible to disable them completely and also reduce the time they
run for. Both of these options will make your handset respond faster than
before. To enable this option go to settings, select Developer options there
and scroll down to select the animation scale (Transition, Animator, and
Window) and toggle all to “Animation off”. By doing this your User
Interface on the device might not be pretty but by doing this, your
smartphone would definitely become faster when compared to its performance
before.
15.
Get detailed information about your Moto G
You can get the detailed stats and
information related to your Moto G such as usage statistics, battery
information, phone information, and WiFi information by simply
dialing *#*#4636#*#*. This one is handy to get the details about your
Moto G in quick time.

Testing
16.
Android animation on your device
Do you want to get the Android
animation on your Moto G? Head over to settings, select About phone and tap on
the Android version for 3 three times quickly, then you can see the Android
version your are using on your Moto G. You can access it by heading over to Settings
> About phone > Android version.

Android animation
17.
See your notifications even after clearing them on your Moto G
Do you clear all the notifications
without seeing them on your device? Are you busy all the day and have no time
to see them on your Moto G? Google has provided a solution for all such folks
who have cleared their notifications accidentally or intentionally. Follow
these simple steps and you can simply get back all your notifications organized
according to date on your Moto G. Go to widgets from your home screen, grab
“settings shortcut” over there and move it on to your home screen and select
notifications over there on your device. There you can see all the
notifications you have cleared. The path for this is Widgets > Settings
shortcut > Notifications.
18.
Usage of various options to determine your location will also effect your
device’s performance
In the previous versions of Android,
determining your location was solely based on usage of GPS and it didn’t use
other options. Even though it gives precise location it consumes fair amount of
battery life and leave you with empty battery. Android’s latest version KitKat
now comes with three modes for location determination. The three modes are
Battery saving, Device only, and High accuracy.

Location mode
High accuracy uses GPS, Wi-Fi
and mobile networks to determine your location. Battery saving uses
Wi-Fi and mobile networks to determine location. Device only uses GPS
to determine location from your Moto G. The Battery saving method is precise
and it doesn’t consume much battery on your Moto G. To enable this go to Settings
> Location > Mode. Select the Battery saving mode so that you can get
better battery backup on your Moto G.
19.
Immersive mode on your Moto G
The “immersive” mode is one of the
newest features of Android KitKat which gives you an unimpeded view on
your current application by removing all of the on-screen interface on your
device. Apps that support immersive mode will automatically remove UI elements
on your device screen. If you want options, just swipe down from the display so
that you can see the UI elements. MX player, Asphalt 8, Play Books are some of
the applications where you can enjoy this mode.
20.
Alternate SMS client on your Moto G
In Android’s latest version KitKat,
Hangouts replaces the default SMS client on your device, and it does it’s job
perfectly by integrating instant messages and text chats. It also offers
video chats and is integrated to Google accounts and many other things.

Default SMS app
To make Hangouts as default SMS app
on your device, go to Settings and then select more and select from default SMS
app. The path is Settings > More > Default SMS app.
21.
Print wirelessly from your Moto G
We mostly rely on paperless
documents in our day-to-day life, but sometimes we need a hard copy where
digitally signed PDF isn’t enough for the need.In the latest versions of
Android which is KitKat, Google provided us wireless printing with HP’s
Cloud Printing application. But the backdrop of this thing is that only certain
applications support the feature at present. But this feature is a wonderful
feature as we can print documents directly from our Moto G.
22.
Monitor your data usage with your Moto G
Our smartphones consume lot of data
as they are loaded with many apps which update regularly. Most of the carriers
enforce data limits and charge heavily once the data limit is crossed leaving
you with a very less balance. With Android’s built-in data usage monitor, you
can see exactly how much data you use on your device. You could even disable
data use by setting limits and also set warnings for data usage. When the
limit is reached you will get warning and mobile data will be disabled when it
crosses the limit you set on your device. You can see your data usage by
selecting cycles and can also reset your data counter to zero.
23.
Dismiss an alarm before it plays around with your peace
If your alarm sounds when you’re in
traffic or during a meeting, think how awkward it would be. In the Android’s
latest version KitKat, you can dismiss an alarm before it bothers you. You will
get a pop-up notification an hour before the alarm is due to fire in the
notification bar. It allows you to dismiss it before it fires.
24.Know
Process Stats on your Moto G
In the latest version of Android
KitKat, in the Developer options Google has provided Process Stats section. It
contains all kinds of information about the apps that are running on you
smartphone. It is ideal and geeky.It is for those people who want to fine tune
their device’s performance. To know these details, head over to Settings,
select Developer Options and select Process Stats in there. The path is Settings
> Developer Options > Process Stats.

Process stats
25.
Power saving mode on your device
Power saving mode is one of the
features which helps you a lot to get better battery backup. By switching on
the Power saving mode in your device, you can increase your device’s battery
life. This mode will automatically restrict background data until you’re
charging your smartphone again. Also some apps and services won’t work unless
you are connected to a network. You can enable it by heading over to Settings
and selecting Battery saving over there.

Battery saving
26.
Encrypt data on your Moto G
This powerful option will let you
encrypt your downloaded apps, accounts, settings, and their data, media
and other files. Once you encrypt your Moto G, you need to type a numeric PIN
or password to decrypt it each time you power on your device. Remember that
forgetting the PIN will cost you, you cannot decrypt your device except
by performing a factory data reset which erases all your data, which is a
painful one.This process of encryption of your phone takes an hour or more.So
you must keep your device plugged in until encryption is complete or else there
is a chance of losing your valuable data. To encrypt your Moto G – follow
this path: Settings > Security > Encrypt .

Data Encryption
27.
Reboot your Moto G in safe mode
As you could reboot your computer,
you can also reboot your Moto G in safe mode. Once you switch on your smartphone
in safe mode, all the third party applications will be disabled on your device.
In the latest Android versions, Google has provided this useful feature. If
something goes wrong on your phone ,you can try this mode. By enabling this
mode you can troubleshoot your Moto G. By following these instructions you can
switch your phone to safe mode.

Reboot to safe mode
* Long press the power button on
your Moto G
* Long press the power off option on
the screen and you get the option as “Reboot to safe mode”.
Subscribe to:
Posts (Atom)